Wednesday, December 2, 2009

2009 Bigyver Christmas Gift Guide

If your looking for stuff to get guys or gals this Christmas following is a list of things that I have found over the last couple of years that I think are great and would make some fabulous gifts.

1 - ExOfficio Boxers and Briefs - These are the best I have ever found and come highly reommended. I dumped everything I had one I found these. They are not cheap but you get what you pay for. Charcoal or black please.

http://www.exofficio.com/product_details.aspx?item_cd=1241-0016&key=fbeeef5c-ca14-42c6-896b-916f827df8a0

2 - Petzl Tikka XP2 - I have last years version and this new model looks to be great. They make some cheaper models but this one is the best function and value.

http://petzl.com/en/outdoor/tikka-zipka-series/tikka-xp

3 - Nalgene Narrow-Mouth Loop-Top Water Bottle - 32 fl. oz and 16 fl. oz. - I like the 16 oz. model and keep them in the frig instead of buying bottled water. Also like the new old-style canteen.

http://www.nalgene-outdoor.com/store/SearchResult.aspx?CategoryID=69

http://www.nalgene-outdoor.com/store/detail.aspx?ID=1262

4 - Thermos beverage can Insulator - These are great and I buy them a case at a time to give as gifts.

http://www.thermos.com/Product_detail.aspx?CatCode=PART&SubcategoryID=36&ProductID=283

More to come.

Tuesday, November 17, 2009

Slim Jim 2 Meter Antenna Project

This project was based on the basic design from WB5MAJ, Fred Siebenthall, and I appreciate the detail that he went to in his write-up of his antenna project. This entry is for my "remote deploy build" but I have another variant mounted on a PVC staff connected to my chimney.

E-mail me if you want a copy of his pdf for a project of your own.

Here is the finished product with the exterior cover on.
Here is the top cap with nylon screw and loop for hanging the antenna up.
Here is a view of the underside of the top cap.Picture of the bottom cap with the pigtail sticking out. The pipe clamp is used to hold the cap on while providing an easy way to remove the internal antenna from the outer casing if needed.Close-up of the bottom cap with slot cut for cable exit.This is the internal PVC carrier with the antenna wire wrapped around it and the pigtail goes up through the bottom and comes out at the cutout futher up the pipe.This is a shot of the cutout and the showing the connection of the pigtail to the antenna wire. The wire goes through the 3/4 pvc pipe via drilled holes. Wire is bare 12g copper wire. Close-up of attachment to antenna wire.

Friday, June 19, 2009

2009 Fishing Trip to Lake Barkley!

Great fishing trip to Lake Barkley with Coaches buddies. Caught 3 fish over 5 pounds, couple of 3 pounders and 3 or 4 in the 2 pound range. Following are pictures of 3 fish caught on 3 consective casts!!

This one was just over 2 pounds.This one was around 2.5 pounds.This one weighted 5 pounds 4 ounces!!


Pictures from recent amature radio tower antanna repairs at HCA.

Our big beam antenna, which allows us to basically talk all the way around the globe, appearently took a direct lightning strike and fried the balun up on the antanna so we got the new parts and then had to lower the tower and antenna down to replace the balun.

This picture show our 4 antennas on the roof. The big beam antenna is easy to spot but there is also a folded dipole, a G5RV wire, and a 2 meter/70 cm UHF/VHF just below the beam.


Assembling the crew.Getting ready to lower the tower onto the ladder to replace the balun.The culprit! Quite fried. Yikes!!
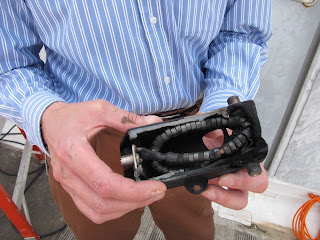
Implementing the lightning arrestor box. Nice work Jack KA4OTB.
Before.After. Nice.Checking out the successful work on the antennas.
Many thanks to all who assisted in the project.
  • HCA Maintenance Crew - Thanks Guys!!
  • Williamson County ARES Members - Jack Cox (KA4OTB), Dave Matthews (KI4PSR), Hilton Dean (W4GHD ), Randy Paulson ( )
  • HCA Amature Radio Crew Members - Rick Froggat (KI4RQV), David Gatewood (N2DAG), and myself, Keith Walker (K1KRW)
  • Also thanks to HCA for supporting our volunteer efforts to man this station for disaster communications with great backing.

Tuesday, March 31, 2009

Niterider Digital Pro-12 E Bicycle Light Battery Rebuild

The Niterider Digital Pro-12 E bicycle light is such a well built system that with regular use the rechargeable battery will die long before the light has lost it's useful life. Since this light was originally built battery technology has greatly advanced and the new Li-Ion technology has pretty much taken over in this area and many pre-built battery pack are available from suppliers that work well to rebuild the battery for this light.


The Niterider Digital Pro-12 E bicycle light battery is pretty simple and no electronics "in" the battery so the light head itself has all the electronics in it. Therefore if you can supply it with an agreeable current it will work. This is not the case with the next generation lite from Niterider called the Niterider Digital Pro-12 LCD which came with a "Smart" battery with electronics and a control board in the battery so you cannot just drop in a battery pack, soder it up and be in business.


The pack I found is a 14.8 volt 4400 mill amp Li-Ion battery back that is already pre-assembled with a PCB control board that these new batteries require. These also require a new charger but it a reasonable cost item. The original battery was a 13.2 volt but the light is capable of handling the higher voltage and it makes the light a little brighter. I am in the process of buying a 13.2 volt regulator and will update when it is installed.

Here is the link for the battery:

http://www.all-battery.com/li-ion18650148v4400mahpcbpreotectedrechargeablebatterywithbareleads.aspx

Here is the link for the charger:

http://www.all-battery.com/universalfastsmarttlp3000chargerforli-ionli-polymerbatterypack148v4cells.aspx

Basically all you do is:

1 - break open the battery by jabbing and working around a thin metal piece at the junction of the top cap and battery case bottom to break the glue bond

2 - Twist the top off to expose the old battery.

3 - Cut the two leads close to the old battery connections

4 - Take out the old batteries and the spray foam used to hold them in place.

5 - Slide in the new battery pack - It will ovalize the base a little but will be corrected enough when you screw back on the top cap.

6 - Put some shrink rap on the leads and then soder them black to black and the red to the white.

7 - Slide the Shrink wrap down and heat with a flame.

8 - Twist the cap back on.

9 - Cut the old charger connector off and connect it to a removable lead supplied with the charger. (You will not be using the old charger any more.

10 - Select the 14.4 volt level on the charger and plug it in to charge the battery.

11 - Enjoy.

Niterider Digital Pro-12 E Bicycle Light

I do a lot of road night riding due to time constraints of two small children and the light system I use is an older version made by Niterider called the Digital Pro-12 E (Extream). This lighting system is about 8 years old but I think it is still one of the best ever built from a capability, reliability and safety standpoint and by rebuilding the battery unit with a new Li-Ion battery it is also longer lasting and lighter than the original configuration.


Let me also say that here in 2009 there are some great bicycle lights being made with the new LED technology with fabulous light output, light weight, reliable and great prices and I have recommended many to people looking to do some night riding but I like the older system I have mainly because of the vastly superior integrated taillight and the ability to easily rebuild the battery.

Tail Light


Many people focus a lot of their attention on the headlight and then slap a little red blinky light on the back. To me the most danger from night riding is the car coming from behind me in my lane as they are the car that will need to take some action not to hit me. So I tend to put a lot of focus on the ability of the tail light. The tail light that works with this Niterider system is pretty much considered the brightest you can get and the mounting bracket hangs the light low below your seat bag for great visibility to drivers. Also since it runs off the battery powering the headlight it does not lack a strong power source and you do not have to manage another set of batteries. This tail light really gets the drivers attention and you can tell a marked difference in the respect you get versus the much less powerful taillights.

Niterider has chosen with their new generation of LED lights not to include a capability to drive their tail light from the light battery so you will have to get an older light to use their great tail light which you can still buy as a part off their web site. It's not cheap but you get what you pay for.

Head Light

The Niterider Digital Pro-12 E is a dual bulb halogen light that has a 20 watt flood and a 12 watt spot bulbs. The digital control allows you many different power and light settings to cover whatever your lighting needs are. You can run it at 32, 20, 12, 9, or 6 watts and it also has walk, flash, sos and beacon modes if you need them. It uses a water bottle battery which can be easily rebuilt and makes for easy and quick mounting.


I have rebuilt two batteries so far with one done with NiMH and another with a new Li-Ion battery pack and the new Li-Ion pack is great and half the weight and 25% longer battery life.

I get these off of ebay for about $50 and then rebuild the battery to create a great light that will integrate with the fabulous Niterider Tail Light for many more years of service.
Summary
If you want a great light with a superior integrated tail light solution then it is worth the extra effort to resurrect one of these system off of ebay with a simple new Li-Ion rebuild of the battery and if you are getting a light for road riding then check out the ability of this tail light in person before making a serious investment as it could very well be the difference between life and death when night riding.
KW

New Bicycle Light Mount Post

I found a new mounting post for my bicycle light that works great and continues to let me use "wing" type handle bars which have less space for mounting stuff.

This is a Minoura "Besso" which is primarily designed for mounting on your fork and has a broad range of size adjustment and works great on this handlebar application. Rock steady and the attachment process is great.

Vendors marketing info:

Minoura Besso LH-50 Fork Mount for Headlights. Minoura's Bésso LH50 fork mount clamps to either side of your front fork, provides a good spot to mount your headlight. Mounting your headlight well below eye level helps you see potholes and other road hazards, because they'll cast visible shadows. It can also be used to attach various accessories to your handlebar, stem or frame tubes. Adjustable clamp band fits around things from 19-35 mm (3/4" to 1 3/8") in diameter.